3/23/2024
While in the process of installing TAM Valley Depot Frog Juicers, I discovered by accident something about the ATLAS #8 Customline Mark IV turnouts. I had installed a Frog Juicer and connected the wire coming from the frog of an ATLAS #8 turnout only to discover the frog on this turnout wasn't getting power. This was because the connecting bar that the wire gets soldered to and then connects to the frog had an intermittent connection. Upon checking this connecting bar for continuity using a multimeter, I was not getting a good connection. What to do? Since this turnout was already installed on the layout, I drilled a number 69 drill hole into the side of the Guard Rail and soldered a wire into that hole. I made sure to solder this wire on the outside of the guardrail as this would avoid any conflict with the flangeway of the frog.
 |
| An ATLAS #8 Turnout showing the Frog and the connecting bar |
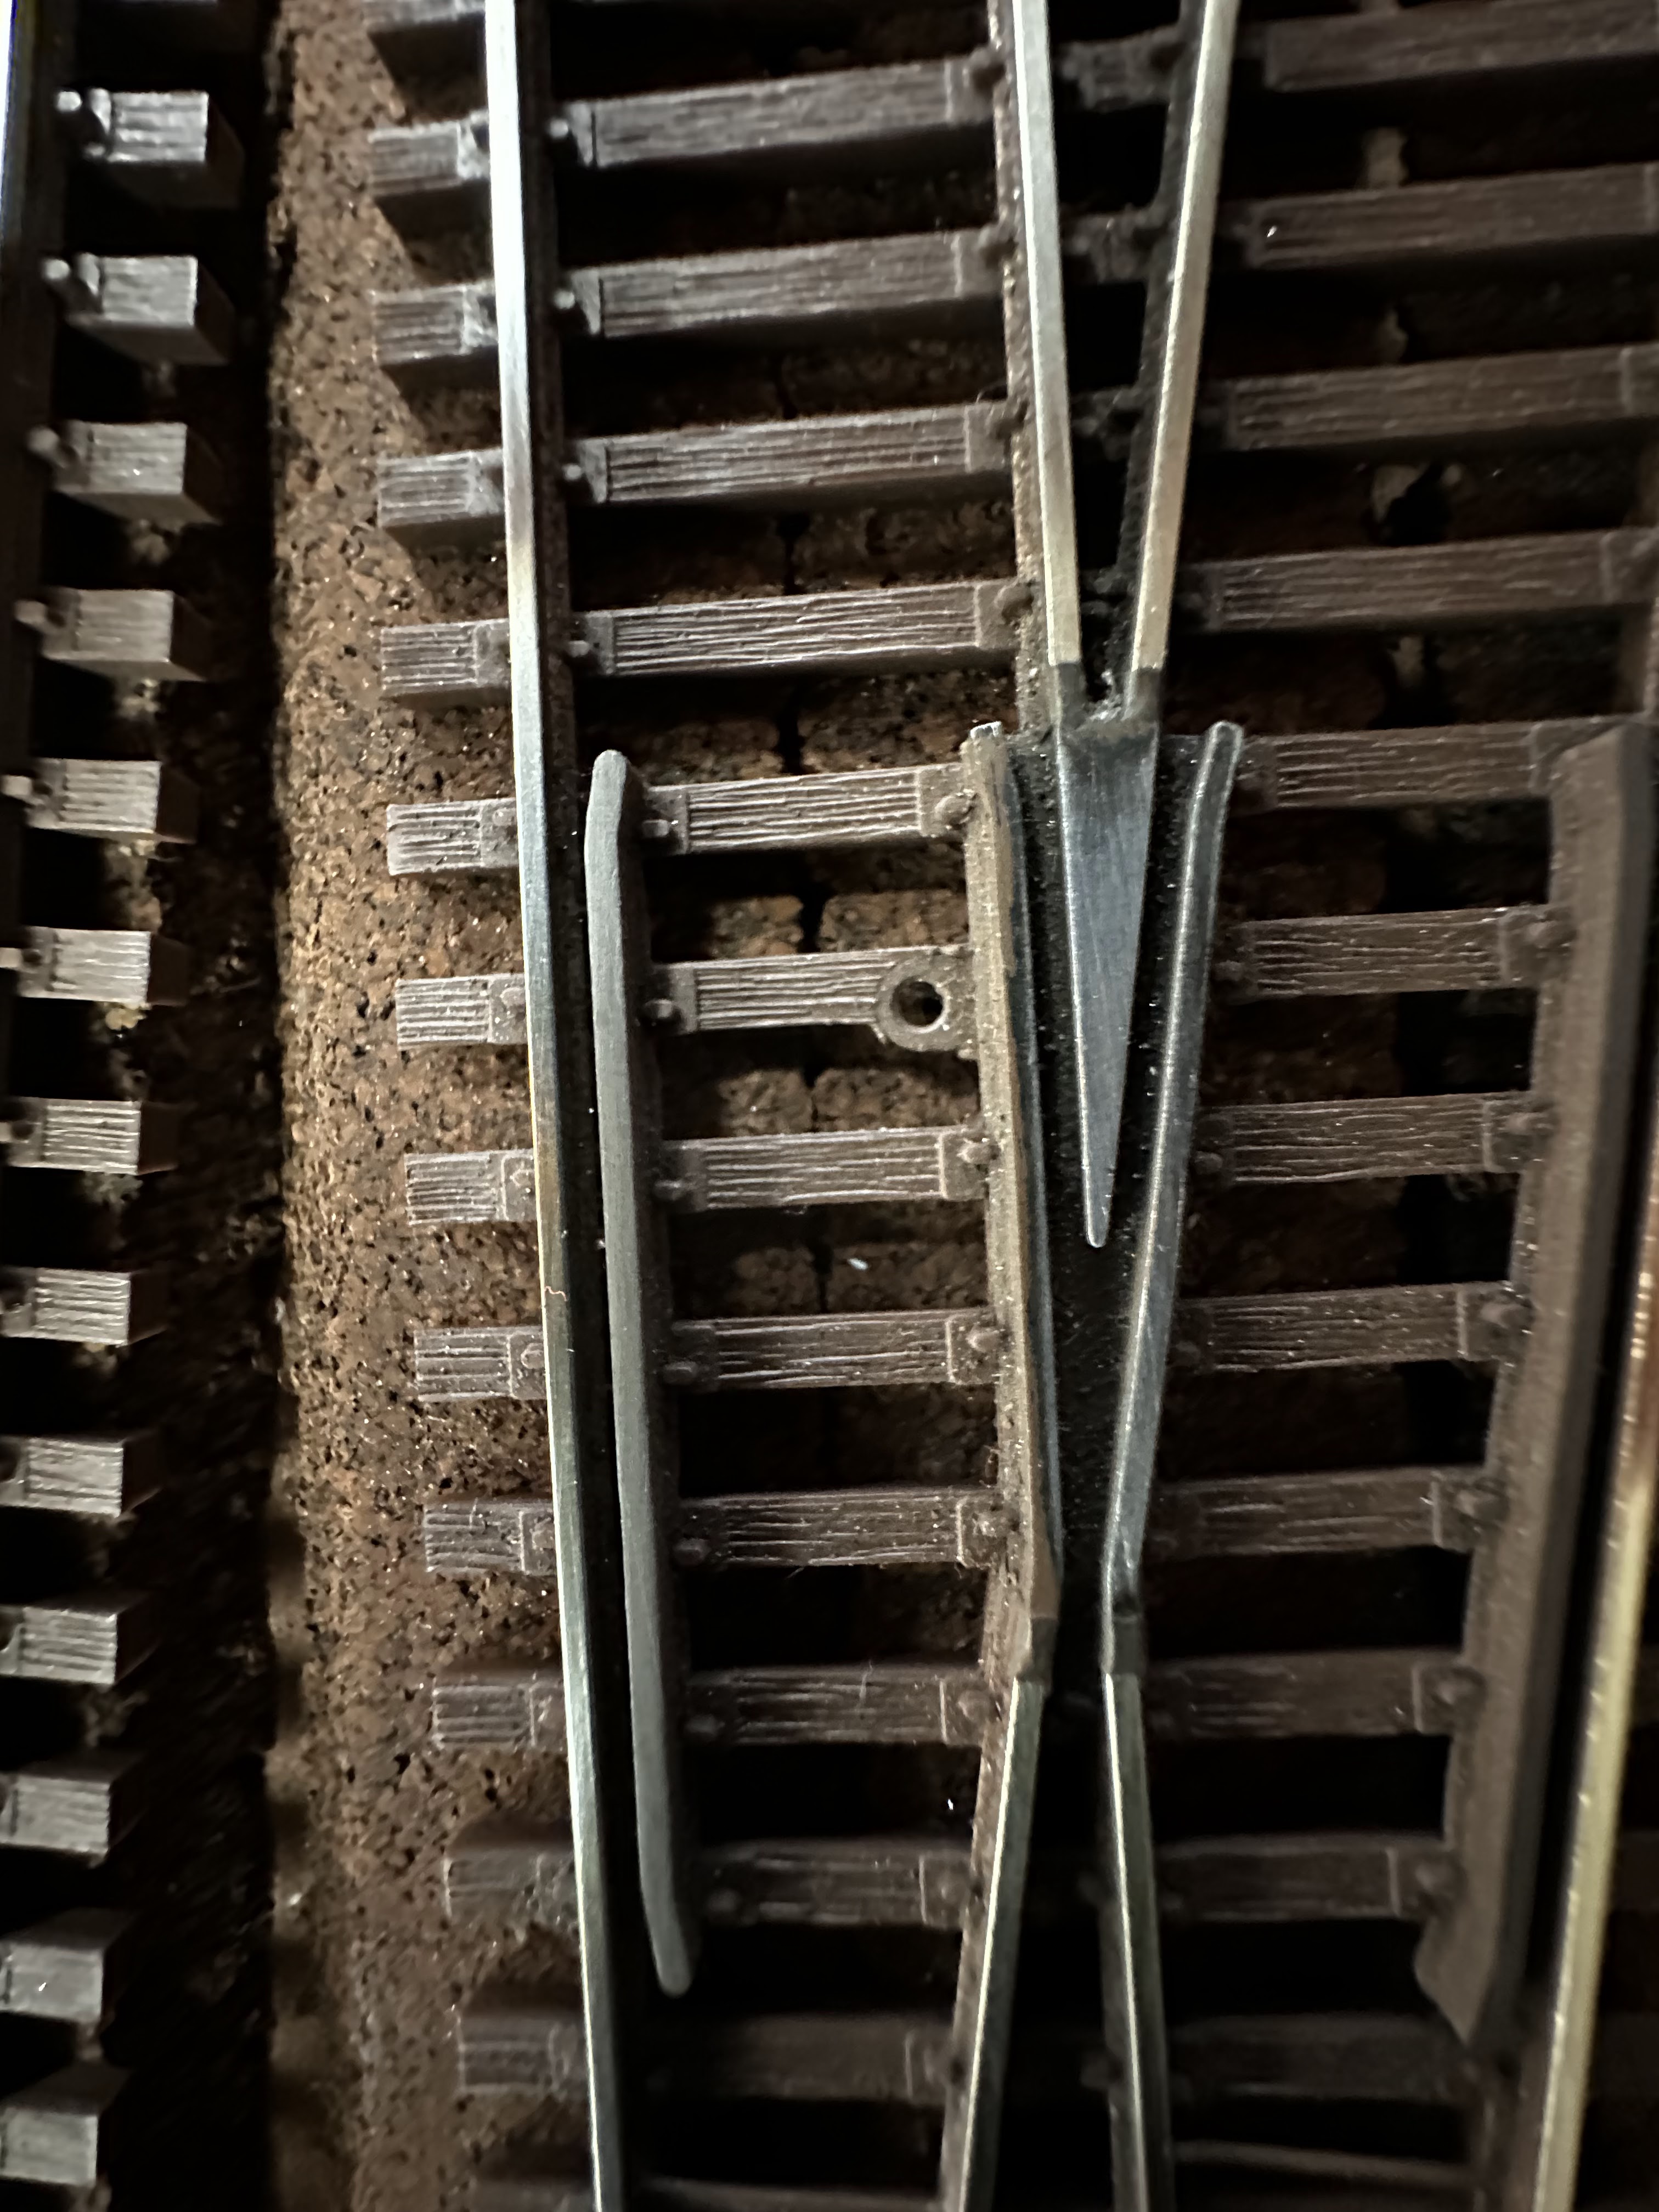 |
| An ATLAS #6 turnout showing the one piece Frog |
The ATLAS #6 turnout has a one piece Frog where the hole that accepts the wire is part of the Frog unlike the Frog and the connecting bar on an ATLAS #8 turnout which are two separate pieces. Lessons Learned: Make sure to check for continuity of the connecting bar on an ATLAS #8 turnout BEFORE installing it.
TAM Valley Frog Juicers
I have found the TAM Valley Frog Juicers to be indispensable at making your Trains run much better. A Frog Juicer power's the Frog on an ATLAS turnout and reverses the polarity when the turnout is thrown making for much better operation for short wheel based locos, especially on #8 turnouts where the Frog is quite long. Something to be aware of however. Always after installing a TAM Valley Frog Juicer test it by running a loco over the turnout in both directions and with the turnout thrown in both positions. If upon doing so your loco stops abruptly right at the Frog, this could indicate the Frog Juicer isn't switching the polarity as it should. The way I checked this was by using a 12 volt auto test light across both rails. If the auto light tester didn't light up no matter which rail you checked or if you simply look at the LEDs on the suspect Frog Juicer board and they don't change state when you throw the turnout, you may have a bad Frog Juicer. Of all the Frog Juicers I've installed, only one was bad. A pretty good track record if you ask me.
1/13/2021
Arnold Yard has been completed! Since these pictures were taken, the Arnold Yard Run-Around Track has been installed and is in service. I am now working on installing the corn syrup processing plant trackage in Wendel. Arnold will be a busy place as it has the responsibility of
breaking up and making up Trains as the come into the Yard from far away places as well as on-line industries. Arnold Yard has been redesigned to better enable the YardMaster to do His/Her job and keep up with the flow of incoming traffic. As they say, let a Yard get congested and it will shut down the entire Railroad so it is hoped that the redesign of Arnold Yard will prevent this from happening.
 |
| Looking West moving left to right is the Arnold Team track, Arnold industrial track and the classification tracks |
 |
| Looking East shows the class tracks with the Arnold Engine Facility tracks in the background |
 |
| The Arnold Engine Facility |
 |
| A closer look at the Arnold Engine Facility |
1/3/2021
Arnold Yard Update
Construction of the Arnold Yard Caboose & Thru tracks have been completed. The Arnold Yard Industry and Engine Facility tracks are in progress as shown in the photos below. Next is the modifying and installation of 5 more turnouts for the Engine Facility and then the hooking up of track feeders and Arnold Yard will just about be ready for service! Exciting times on the Great Basin & Southwestern Railroad as this has been a long time in the making!
 |
Caboose track, Thru track or Runner as they are sometimes called along with the Industry and Engine Facility tracks shown in the middle of the picture |
 |
| Pic showing the series of turnouts for the Caboose Track, Industry and Engine Facility Tracks. Won't be long now! |
12/22/2020
Arnold Yard Classification Tracks
The classification tracks for Arnold Yard have been installed and are in service! I tested these with my trash train and they work great! Next I will install the Engine Facility and Arnold Yard industry tracks.
Stay tuned!
 |
| Looking East at the newly installed Classification tracks in Arnold Yard |
 |
| BNSF Loco 2099 and SP Loco 3953 in the class tracks in Arnold Yard awaiting their next assignment |
 |
12/18/2020
Hearne Siding
Hearne siding is in service! I only have one more siding to do after this which would be the Passenger siding at Arnold. Hearne siding can hold a sizable Train, maybe 8 to 10 cars which is what I was hoping for. Hearne also has an industrial siding or spur but not quit sure what this industry will be yet. I was also thinking of doing like MINA and adding an interchange track at Hearne but not sure I have enough room. We'll see.
SP #4120 testing the newly installed Hearne Siding.
No derailments, no problems, Priceless!
 |
| 4120 in the hole at Hearne siding waiting for an Eastbound |
 |
| 4120 at Hearne siding. Track to the left of 4120 is the Mainline and the turnout in the foreground is for the Industry lead at Hearne |
 |
| East end of Hearne siding right before it's completion |
12/13/2020
Hanford Siding
Today I completed Hanford Siding!. This is probably the longest siding on the Railroad and will enable the Locals to stay off the mainline as much as possible.
 |
| Hanford Siding with SP Cabforward 4120 |
 |
| The East end of Hanford siding begins or ends just this side of APK crossing or what Crews affectionately call "A" Tower |
12/6/2020
Arnold Yard Lead
After several hours spent cleaning up the Train Room, the Yard Lead for Arnold Yard has been completed! This track (it's the one with the yellow thumb tack) is as long if not longer than the longest classification track in the Yard as it should be. This is sure to see plenty of action making and breaking Trains over the years. Can't wait!

Arnold Siding, Yard Turnouts and Crossovers
Arnold Siding and the Arnold Yard Turnouts have been installed this means I can start construction of the Yard Class tracks, Engine Facility and Runaround Track as well as the Arnold Depot Passenger Track.
Some of the turnouts didn't quit have enough room for a switchstand so I had been reading about using strips of Evergreen or Plastruct plastic or varying thicknesses placed under the switch rod (the part the switchstand attaches to) and between the Headblocks of the turnout.
This seems to work very well in maintaining plenty of force against the switchrod to enable a Train to go over a it without concern of it "picking" the switch.
The crossovers are for East Arnold siding and the escape track crossover. An escape track allows a Train or Engines to "escape" or move out of the way of opposing traffic as quickly and as efficiently as possible. In this case, locomotives coming off of or going onto a Westbound Train can run around it's Train as quickly as possible minimizing interference with the Yard switcher enabling the Yardmaster to get His/Her work done unimpeded.
 |
| The turnouts for Arnold Yard are on the left and the turnouts for Arnold Depot are on the right |
 |
| The 2 crossovers seen near the top of this picture are the East end Arnold siding and the escape track crossover |
11/13/2020
Your running a Train around your layout and really enjoying yourself or your kicking cars around in the Yard or industry when suddenly, your loco stalls on a turnout you have ran Trains over hundreds if not thousands of times before. So right off, you clean the track and you clean the wheels of the offending loco. You place the loco back on the track and it works fine, for a while when it happens again. So you go through the whole routine again, cleaning track and loco wheels but this time, your loco still stalls on that one turnout. So, being the diligent Model Railroader you are, you clean the point rails where they meet the stock rails and after a couple runs over this turnout, your loco stalls again. Now what?
There are two areas of concern on a turnout, actually 3 but I'll get to the third one in a minute. A turnout has the stock rails which are the outer most rails on either side of the turnout, the point rails which are the rails which move to enable a train to go one way or the other, the frog which enables a train to pass over the other rails of the turnout, the closure rails that rest between the frog and point rails and the frog rails which reside just to the left of the frog in the photo below.
The point rails are the area of concern as these are the moving parts of a turnout and can cause a lot of grief when they get dirty and are used a lot. I can't say for anyone else but on my layout, most all of the turnouts will take a beating. It's easy to forget that there is only 12 to 18 volts going through the rails which isn't very much and a little dirt or wear at a contact point or pivot point is all it takes to make a turnout stop working as it should.
In the photos below, I show you what I do to avoid this headache by modifying my turnouts before I even install them on the layout. So come along with me as I show you what I do to prevent the grief that is associated with a troublesome turnout.

An Atlas code 83 #6 Righthand Turnout with Modifications.
Note the red & black feeder wires.

Jumpers soldered between the stock rails and closure rails

Soldered jumper between point rail and closure rail

Another photo showing the jumper from point rail to closure rail

Area of concern where the point rails contact the stock rails

Area of concern showing where the point rails (left) pivot or turn
where they come in contact with the closure rails (right)
I have a Dremel Stylus drill motor that I use a #68 drill bit to drill a hole into the sides of the rails to accept a #22 AWG stranded wire. This method has saved me countless hours of frustration trying to solder a #22 AWG wire to the sides of the rails. I hold the turnout in my hand while drilling these holes but be careful not to get your fingers in the way as the drill breaks through the rail. How do I know that?
I also use 2, 3 inch by 2 inch by 1/2 inch thick steel blocks to hold a turnout steady while I solder the feeder wires and jumpers. These steel blocks serve a dual purpose as they also act as a heatsink. Once I got use to the method I had developed, it took me all of 15 minutes to modify a turnout.
I use a brass scratch brush sold HERE on Micro Mark to clean the surface of the rails of any dirt and oxidation prior to soldering. A note of caution: Whatever you use to clean off the oxidation, be extra careful with a turnout, especially on the point rails as these are thin and not held very securely to their points of contact and can break off rather easily. Use very lite, gentle strokes and this should do a good job of removing any dirt or oxidation from the point rails prior to soldering.
As a reminder, when soldering, get in and get out. In other words, have the pieces to be soldered prepped and ready to go so you can make a nice quick solder. The plastic ties won't take a lot of heat and WILL melt if you apply too much heat from your soldering iron so be sure the pieces to be soldered are clean beforehand and use a good flux.
The Trackplan
This page will encompass everything having to do with track. That would include the trackplan design, the trackwork itself as well as the electrical for the track. I have come up with some techniques I'd like to share with you that I have found to be useful and I hope you find them useful as well.
The trackplan was derived from Doug Smith's "Brooke Valley" layout he had from back in the Fifties. This plan was introduced to me by Don Ball of The Stockton and Copperopolis fame. Thank You Don! Check out Don's beautiful Stockton and Copperopolis layout. Don does a lot of his own scratch building of Locomotives and structures from photo's of the Stockton and Copperopolis from around 1895. Click on the link shown above and enjoy.
I have taken the liberty to modify the plan based on what I learned from my previous build of this same trackplan 15 years ago. It has been a tremendous learning curve, one of which I'll never stop learning from but like so many other things in Life, you never stop learning and that's what makes Life so FUN!
 |
| The original Brooke Valley by Doug Smith |
 |
| And Doug Smith's original trackplan of the Brooke Valley |
 |
| With the exception of the Yard, the plan is the same |
 |
| The track-plan as shown being transferred onto the plywood |


A quick video showing what my experience was using a Pounce Tool vs a Machinist Punch
Arnold Yard

I've modified the Yard to my understanding of Yard design based on my readings of the Layout Design Special Interest Group's Layout Design Primer and Craig Bisgeler's "The Ten Commandments of Model Railroad Yard Design". I also read the books published by Model Railroader on Yard and Engine Facility design as well as asking my Professional Railroader Friends for their ideas. Below is a pic of my Yard or the finished product but is it ever really finished? Never say Never!
As you can see, this is a modern Yard that has no Turntable or Roundhouse, they just wouldn't fit in the plan so I had to make sacrifices and I'm glad I did because this has given me more room to incorporate a more efficient Yard design.
For example, the crossover that you see next to the Run Around Track that goes from the A/D Track to the Main Trk. use to be situated to the far left of the screen. This created a sever bottleneck as the work of the YardMaster was constantly being interrupted by arriving and departing Trains as they would have to access this part of the Yard to get to the Arrival and Departure track. This severely hampered the YardMaster's ability to keep up with the workload of the Yard. Not good. This had to change.
So, I moved the crossover in question to the right, past the Engine Facility and Class track leads. This gives the YardMaster the ability to access any part of the Yard unimpeded, this includes the Run-Around track! I also extended the Yard Lead giving the YardMaster ample room to work any track in the Yard including the Arrivals and Departures track.
The caboose track on my previous layout was buried in the Yard thus it took a lot of time to fetch or drop off a caboose. This track should if possible, be somewhere near the vicinity of the Mainline. So I placed the caboose track nearer the Main Track, parallel to the Runner track going from the mainline to the Engine Facility and can be accessed from either end! This will be a BIG time saver and one less headache for the Yard Switcher.
I also added or should I say modified what use to be a stubend passenger train storage track and turned it into a Run-Around track which would give the Yard Switcher the ability to run around a cut of cars that needed to be setout in any of the Yard industries or could be used for work in the class tracks or used by a local that needs to get to the other end of it's train before leaving Town.
I am always a Student of the Trade and know I have lot's more to learn but I think for now, this plan ought to be a big improvement in assisting the YardMaster in keeping up with the workload Arnold Yard is sure to experience once completed.
Staging
I had read about staging many years ago in Model Railroader Magazine but, like operations, I didn't understand the concept so I disregarded it thinking I'd never have a need for it as I was content with just running Trains. This was to change
Staging gives a layout a connection to the outside World by giving the look and feel that a Train is coming from the Nation wide rail network onto the layout. This can be and usually is, a foreign Railroad delivering traffic to the layout and picking up traffic generated by industries on the layout. This adds a whole different dimension as it adds another job to be worked by someone and offers the chance to model a foreign Railroad or Railroads. Staging provides so many opportunities to model prototypical operations and I am very much looking forward to this new addition to the layout.
5/13/2020
Well, I neglected to take pictures of the staging under Arnold Yard but will have plenty to share with you soon. With some help from my Wife Arlene, I moved the staging under Arnold Yard to see how it would work and it looks like it's going to work GREAT! I will need to cut the buss wires and re-arrange some other wires but figured I would need to do this when I first put the staging together a couple Months ago. I also want to install a guard rail on both sides of the staging and at the end just in case. When my Brother's Burlington Northern F45 derailed and hit the floor, snapping off the rear porch, it showed me the importance of having a guardrail where needed and it is most definitely needed on staging.


Track Feeders
I know there are a lot of Model Railroaders who pride themselves on their soldering skills and I so envy these individuals. That's not to say I can't solder, I just have a very difficult time soldering a 22 AWG wire to the side of a HO scale code 83 rail. This was the one thing holding me back from ever starting this layout. I had to find a better way that works for me so I went to work experimenting with different methods and ideas and I came up with what I feel is a method that works pretty well. This is not my idea and I do not lay claim to any of it as I may recall reading about this in the model railroad press some years ago.
Using a Dremel Stylus drill and a #68 drill enables me to drill a hole into the web of the rail just large enough for a 22 gauge stranded wire to fit into. This will hold the wire in place automatically while I solder it and makes for a sure footed solder, one that won't break off.
I use the same method when upgrading my Atlas switches for which I have another video showing how I do that. This method has an added benefit in that this can be done AFTER the track has been laid. Just make sure your drill is sharp as a dull drill will take longer to drill the hole and heat up the rails causing the ties to melt. I recommend you practice on a couple of scrap pieces of track before doing this on your layout just so you can get a feel for how fast it goes then you'll know what to expect. And ALWAYS, ALWAYS wear safety glasses and hearing protection as the Dremel drill is of somewhat of a high pitch and may be too loud for someone with sensitive hearing.
Running my Bowser Baldwin VO-1000 locomotive on the newly constructed staging
to test the install of the modified Atlas code 83 switches & Tortoise switch motors. Runs like a Swiss watch!
 |
| My connection to the outside World, staging for the Brooke Valley |

 |
| Staging shown after being painted an Earth tone brown |
 |
| After painting, I laid down some ground foam to see how it would look |
 |
| I like the effect so now I'll come back and do the rest of the staging |
 |
| I'm experimenting with different types of Ballast |
 |
| The one I like and the one the Great Basin & Southwestern Railroad will use is the dark colored one on the right |


Track Feeders
I know there are a lot of Model Railroaders who pride themselves on their soldering skills and I so envy these individuals. That's not to say I can't solder, I just have a very difficult time soldering a 22 AWG wire to the side of a HO scale code 83 rail. This was the one thing holding me back from ever starting this layout. I had to find a better way that works for me so I went to work experimenting with different methods and ideas and I came up with what I feel is a method that works pretty well. This is not my idea and I do not lay claim to any of it as I may recall reading about this in the model railroad press some years ago.
Using a Dremel Stylus drill and a #68 drill enables me to drill a hole into the web of the rail just large enough for a 22 gauge stranded wire to fit into. This will hold the wire in place automatically while I solder it and makes for a sure footed solder, one that won't break off.
I use the same method when upgrading my Atlas switches for which I have another video showing how I do that. This method has an added benefit in that this can be done AFTER the track has been laid. Just make sure your drill is sharp as a dull drill will take longer to drill the hole and heat up the rails causing the ties to melt. I recommend you practice on a couple of scrap pieces of track before doing this on your layout just so you can get a feel for how fast it goes then you'll know what to expect. And ALWAYS, ALWAYS wear safety glasses and hearing protection as the Dremel drill is of somewhat of a high pitch and may be too loud for someone with sensitive hearing.
What I do to prep and solder 22 gauge wires to the rails
No comments:
Post a Comment